Author Topic: Custom Lighting Control  (Read 13236 times)

Patrice Terrier

  • Administrator
  • *****
  • Posts: 1983
    • zapsolution
Custom Lighting Control
« on: January 27, 2018, 06:36:07 pm »
Ok, i succeed to save/restore the lighting parameters to/from the mtl file.

However the current macro doesn't restore all the parameters correctly.
If we choose to save the lightings, we must turn everything to the visible state, and respect exactly the user's preference.
I have restored my initial Mobj_Setcolor (bypassing the macro, until it get fixed) to restore the saving state exactly.


This means, now we can really play with lighting, and use the new menu command "Save lighting to mtl file" when we are pleased with the settings. 8)

« Last Edit: January 28, 2018, 12:06:15 am by Patrice Terrier »
Patrice
(Always working with the latest Windows version available...)

Patrice Terrier

  • Administrator
  • *****
  • Posts: 1983
    • zapsolution
Re: Custom Lighting Control
« Reply #1 on: January 28, 2018, 09:27:15 pm »
Quote
How do you plan to enter the light component's literal numerical values without a color dialog
For me that's the easy part, i plan to use only the predefined color constants already used there:
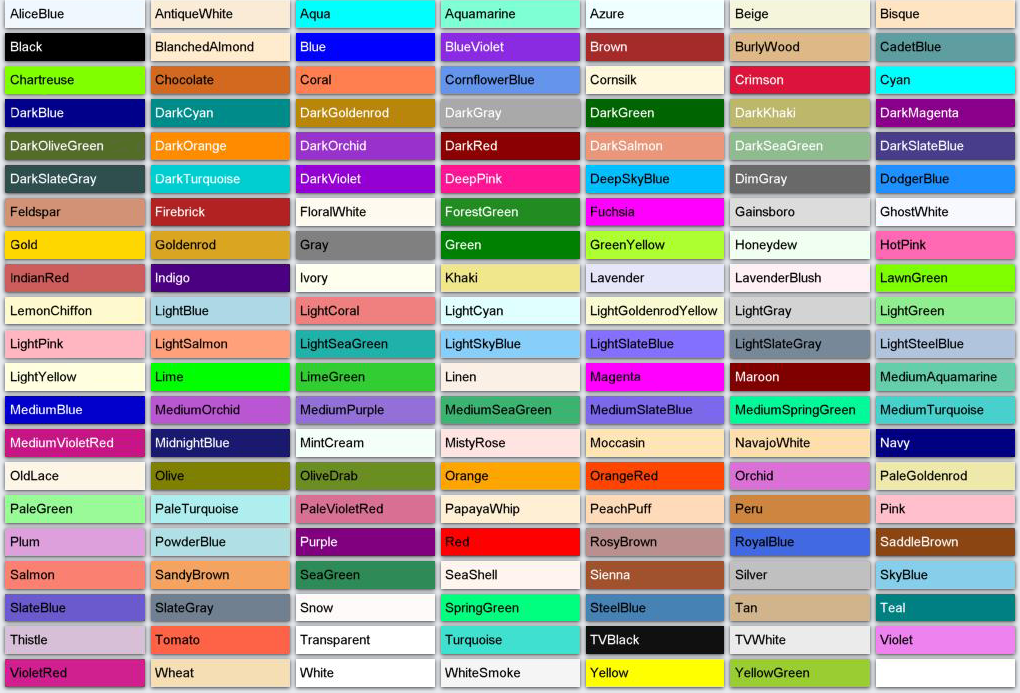
WCHAR zColor[] = L"aliceblue,0xfff8f0,antiquewhite,0xd7ebfa,aqua,0xffff00,aquamarine,0xd4ff7f,azure,0xfffff0,beige,0xdcf5f5,bisque,0xc4e4ff,black,0x000001,blue,0xff0000,blueviolet,0xe22b8a,brown,0x2a2aa5,burlywood,0x87b8de,cadetblue,0xa09e5f,chartreuse,0x00ff7f,chocolate,0x1e69d2,coral,0x507fff,cornflowerblue,0xed9564,crimson,0x3c14dc,cyan,0xffff00,darkblue,0x8b0000,darkcyan,0x8b8b00,darkgoldenrod,0x0b86b8,darkgray,0xa9a9a9,darkgreen,0x006400,darkkhaki,0x6bb7bd,darkolivegreen,0x2f6b55,darkorange,0x008cff,darkred,0x00008b,darksalmon,0x7a96e9,darkseagreen,0x8bbc8f,darkslateblue,0x8b3d48,darkslategray,0x4f4f2f,darkturquoise,0xd1ce00,deeppink,0x9314ff,deepskyblue,0xffbf00,dimgray,0x696969,dodgerblue,0xff901e,feldspar,0x7692d2,firebrick,0x2222b2,forestgreen,0x228b22,gainsboro,0xdcdcdc,gold,0x00d7ff,goldenrod,0x20a5da,gray,0x808080,green,0x008000,greenyellow,0x2fffad,honeydew,0xf0fff0,hotpink,0xb469ff,indianred,0x5c5ccd,indigo,0x82004b,ivory,0xf0ffff,khaki,0x8ce6f0,lavender,0xfae6e6,lavenderblush,0xf5f0ff,lawngreen,0x00fc7c,lemonchiffon,0xcdfaff,lightblue,0xe6d8ad,lightcoral,0x8080f0,lightcyan,0xffffe0,lightgoldenrodyellow,0xd2fafa,lightgray,0xd3d3d3,lightgreen,0x90ee90,lightpink,0xc1b6ff,lightsalmon,0x7aa0ff,lightseagreen,0xaab220,lightskyblue,0xface87,lightslategray,0x998877,lightyellow,0xe0ffff,lime,0x00ff00,limegreen,0x32cd32,linen,0xe6f0fa,magenta,0xff00ff,maroon,0x000080,mediumaquamarine,0xaacd66,mediumblue,0xcd0000,mediumorchid,0xd355ba,mediumpurple,0xdb7093,mediumseagreen,0x71b33c,mediumslateblue,0xee687b,mediumspringgreen,0x9afa00,midnightblue,0x701919,mintcream,0xfafff5,mistyrose,0xe1e4ff,moccasin,0xb5e4ff,navy,0x800000,oldlace,0xe6f5fd,olive,0x008080,olivedrab,0x238e6b,orange,0x00a5ff,orangered,0x0045ff,palegoldenrod,0xaae8ee,palegreen,0x98fb98,palevioletred,0x9370db,papayawhip,0xd5efff,peachpuff,0xb9daff,peru,0x3f85cd,pink,0xcbc0ff,plum,0xdda0dd,powderblue,0xe6e0b0,purple,0x800080,red,0x0000ff,rosybrown,0x8f8fbc,royalblue,0xe16941,saddlebrown,0x13458b,salmon,0x7280fa,sandybrown,0x60a4f4,seagreen,0x578b2e,sienna,0x2d52a0,silver,0xc0c0c0,skyblue,0xebce87,slateblue,0xcd5a6a,slategray,0x908070,snow,0xfafaff,springgreen,0x7fff00,steelblue,0xb48246,tan,0x8cb4d2,teal,0x808000,thistle,0xd8bfd8,tomato,0x4763ff,turquoise,0xd0e040,violet,0xee82ee,violetred,0x5f20d0,wheat,0xb3def5,white,0xffffff,yellow,0x00ffff,yellowgreen,0x32cd9a,";

and here is how i assign them using the hidden color listbox
Code: [Select]
    for (long K = 0; K < nCount; K++) {
        nRGB = (long) SendMessage(gP.hColorList, LB_GETITEMDATA, K, 0);
        nARGB = ZD_ColorARGB(255, nRGB);
        nCol++;
        nID = K + 1000;
        if (ZD_DrawRectangleToCtrl(hWnd, x, y, w, h, ZD_ColorARGB(255, 0), 1, nID+1000, ZS_VISIBLE, ZD_DRAW_OUTLINE, 0)) {
        //if (ZD_DrawEllipseToCtrl(hWnd, x, y, x+w, y+h, nARGB, 0, nID, ZS_VISIBLE, ZD_DRAW_FILLED, 0)) {
            SetObjectAnchorMode(nID+1000, ANCHOR_BOTTOM);
            ZD_SetObjectLocked(nID, TRUE);

            ZD_DrawRectangleToCtrl(hWnd, x+1, y+1, w-2, h-2, nARGB, 0, nID, ZS_VISIBLE, ZD_DRAW_FILLED, 0);
            SetObjectAnchorMode(nID, ANCHOR_BOTTOM);
            ZD_SetObjectImageLabel(nID, TipFormat(List_GetText(gP.hColorList, K + 1)));
            ZD_SetObjectLocked(nID, TRUE);
        }
        if (nCol > 6) {
            nCol = 0;
            x = xOrigine;
            y += h + 2;
        } else {
            x += w + 2;
        }
    }

and the new macro

#define COLORAMB(n) \
    r = (BYTE)(255 * amblight##n##_buf[0]); \
    g = (BYTE)(255 * amblight##n##_buf[1]); \
    b = (BYTE)(255 * amblight##n##_buf[2]);

#define COLORDIF(n) \
    r = (BYTE)(255 * diflight##n##_buf[0]); \
    g = (BYTE)(255 * diflight##n##_buf[1]); \
    b = (BYTE)(255 * diflight##n##_buf[2]);

#define COLORSPEC(n) \
    r = (BYTE)(255 * speclight##n##_buf[0]); \
    g = (BYTE)(255 * speclight##n##_buf[1]); \
    b = (BYTE)(255 * speclight##n##_buf[2]);

to set them this way:
Code: [Select]
    COLORAMB(0); ZD_DrawRectangleToCtrl(hWnd, xOrigine, y, bmW, bmH, ZD_ARGB(255, r, g, b), 0, nID, ZS_VISIBLE, ZD_DRAW_FILLED, 0); ZD_SetObjectLocked(nID, TRUE);
    //ZD_SetObjectImageLabel(nID, TipFormat(List_GetText(gP.hColorList, K + 1)));
    nID--; y = y; ZD_DrawTextToCtrlEx(hWnd, L"Front ambient", x, y, 0, 0, nARGB, fontname, nFontSize, nID, ZS_VISIBLE, nShadow, 0); ZD_SetObjectHidden(nID, ZS_INACTIVE);

This is what has been already documented there:


 :)
« Last Edit: January 28, 2018, 09:34:43 pm by Patrice Terrier »
Patrice
(Always working with the latest Windows version available...)

Patrice Terrier

  • Administrator
  • *****
  • Posts: 1983
    • zapsolution
Re: Custom Lighting Control
« Reply #2 on: January 31, 2018, 10:30:50 am »
Here is the OR64_SL.zip (Simplified Lighting).

How to use it.

1 - Select a 3D model.
2 - To better see the lighthing effects, switch to "Multiple light sources".
3 - Select from the "Lighting" menu the new command "Simplified light settings".
4 - In the overlay window, select a color from the palette, and drag the rectangle onto the light name (or rectangle).
5 - You can enable the "Y rotation mode", to better see the effect onto the model.
6 - Once you are done, click onto the "Hide this window" circular button located at the bottom of the overlay window.
7 - If you are pleased with this setup, use the "Lighting" menu "Save lighting to mtl file".
8 - To cancel the changes, use "Reset scene lighting".

I plan to add more palettes, that could be selected fron new arrow buttons asside of the bottom one...
« Last Edit: February 01, 2018, 10:45:00 am by Patrice Terrier »
Patrice
(Always working with the latest Windows version available...)

Michael Lobko-Lobanovsky

  • Administrator
  • *****
  • Posts: 1481
Re: Custom Lighting Control
« Reply #3 on: February 02, 2018, 07:29:06 pm »
1. Oh? I thought you had it somewhere in the bottom drawer of your desk since the dawn of Time, debugged and ready for use when needed?  ;D

2. I am still not sure where to put your code, Patrice. Line 122 of my overlay.h contains the beginning of an if (K < 3) { block, rather than a switch (K) { on line 123. Can I better have the entire file sent to me, please? TIA [UPD] I noticed the zip attachment above too late, sorry...

3. I think not.

But!

I think it would be very, very handy to have, at the very top of the pane, a line of three checkboxes or some other equivalents among your beautiful widgets that would duplicate the state and function of the three Visible menu checks, and would work in sync with them.
« Last Edit: February 02, 2018, 07:31:30 pm by Michael Lobko-Lobanovsky »
Mike
(3.6GHz Intel Core i5 Quad w/ 16GB RAM, nVidia GTX 1060Ti w/ 6GB VRAM, Windows 7 Ultimate Sp1)

Patrice Terrier

  • Administrator
  • *****
  • Posts: 1983
    • zapsolution
Re: Custom Lighting Control
« Reply #4 on: February 03, 2018, 01:11:07 pm »
Here is the switch version.

Copy OnOff.png into the skin Reader folder.

...
Patrice
(Always working with the latest Windows version available...)

Michael Lobko-Lobanovsky

  • Administrator
  • *****
  • Posts: 1481
Re: Custom Lighting Control
« Reply #5 on: February 03, 2018, 02:18:18 pm »
Thank you Patrice,

The patch works nice with just one objection. When the program starts, LIGHT0 is initially ON and the menu reflects this having its Front (light 0) Visible checked. The Simplified Lighting panel however ignores this setting having all its switches OFF.

Also, have you noticed that when the menu bar has its menu window popped down and flipped a few times by moving the cursor over the menu bar entries, its text outlines degrade somewhat as seen in the attached snapshot? It is always so for me when in the maximized mode but it can also happen from time to time in the windowed mode as well.

___________________________

Why wouldn't you keep Reader.sks in the \Reader subfolder?
« Last Edit: February 03, 2018, 02:26:02 pm by Michael Lobko-Lobanovsky »
Mike
(3.6GHz Intel Core i5 Quad w/ 16GB RAM, nVidia GTX 1060Ti w/ 6GB VRAM, Windows 7 Ultimate Sp1)

Patrice Terrier

  • Administrator
  • *****
  • Posts: 1983
    • zapsolution
Re: Custom Lighting Control
« Reply #6 on: February 03, 2018, 02:48:06 pm »
Quote
Why wouldn't you keep Reader.sks in the \Reader subfolder?
Because without reading first the sks file, i have no idea of the location and name of the skin folder.
WinLIFT is able to change skin on the fly, reading only from the sks files stored into the EXE folder.

Replacing @PATH@ by the complete path of the binary EXE.
"CTLBACK,            @PATH@Reader\CTLBACK.jpg"

Added:
For the menu bar this is because i am using TextRenderingHintAntiAlias
GdipSetTextRenderingHint(graphics, TextRenderingHintAntiAlias);
I shall see what could be done...
« Last Edit: February 03, 2018, 03:23:16 pm by Patrice Terrier »
Patrice
(Always working with the latest Windows version available...)

Michael Lobko-Lobanovsky

  • Administrator
  • *****
  • Posts: 1481
Re: Custom Lighting Control
« Reply #7 on: February 03, 2018, 02:55:03 pm »
OK, got it. Never mind, I was just asking.

Now, when the SL panel is on screen, it covers the IPS display. Could we have its output coords moved accordingly, do you think?
Mike
(3.6GHz Intel Core i5 Quad w/ 16GB RAM, nVidia GTX 1060Ti w/ 6GB VRAM, Windows 7 Ultimate Sp1)

Patrice Terrier

  • Administrator
  • *****
  • Posts: 1983
    • zapsolution
Re: Custom Lighting Control
« Reply #8 on: February 03, 2018, 07:20:01 pm »
Mike

I think i have fixed everything is this new patch.

WinLIFT64.zip (replace your matching files with these).
patch.zip (setup the widget switch default, menu bar, IPS location).

With the SL panel, light settings has become such a breeze, that we can perhaps remove the color picker code...   8)

« Last Edit: February 03, 2018, 07:27:46 pm by Patrice Terrier »
Patrice
(Always working with the latest Windows version available...)

Michael Lobko-Lobanovsky

  • Administrator
  • *****
  • Posts: 1481
Re: Custom Lighting Control
« Reply #9 on: February 04, 2018, 04:34:42 am »
Thank you Patrice.

Re: patch

This patch works better but isn't perfect yet.

1. You've changed the menu bar font. This one leaves no smear but looks brighter and less anti-aliased than the former one. I can bear with that though.
2. Loading a new model doesn't cancel former rotation and IPS display modes.
3. Loading a new model hides the SL panel automatically but the IPS counter stays shifted to the right.
4. Once auto-hidden as per item 3 above, the SL panel re-appears again by itself if you let the main menu drop down for whatever purpose.
5. If you switch off the rotation while the SL panel is still visible, then the IPS counter stays shifted to the right even when you hide the SL panel by its knob. In other words, the IPS counter seems to follow the panel only if rotation is on.

While fixing those, please don't make the IPS counter visibility dependent on the rotation mode. Still mode IPS is also informative when you rotate or drag the model and rendering is close to being continuous due to intensive "mousing". (BTW are you aware it takes 95% GPU and up to just manually rotate or drag the Onyx model across the screen?)

Re: color picker

Yes, I guess the color picker is now redundant and so are the Front/Left/Right (light 0/1/2) menu entries and their descendants including the One dialog sets all option and its associated macros.
« Last Edit: February 04, 2018, 04:45:14 am by Michael Lobko-Lobanovsky »
Mike
(3.6GHz Intel Core i5 Quad w/ 16GB RAM, nVidia GTX 1060Ti w/ 6GB VRAM, Windows 7 Ultimate Sp1)

Patrice Terrier

  • Administrator
  • *****
  • Posts: 1983
    • zapsolution
Re: Custom Lighting Control
« Reply #10 on: February 04, 2018, 10:24:11 am »
Mike

Thank you for your detailed report

Quote
1. You've changed the menu bar font. This one leaves no smear but looks brighter and less anti-aliased than the former one. I can bear with that though.
No i didn't changed the menu bar font (i just disabled the antialias).
However all of these could be setup from the sks file.

Menu bar hilite color:
"MENUBARHILITE,       255,255,255,220" ' 4.35 RGB menu bar hilite.

Use Font:
'"USEFONT,             Tahoma"          ' Font to use Trebuchet MS
currenty it is disabled; meaning that the default "TREBUCHET MS" is being used.
But we could even use a private font if we want, as long as it is provided into the skin folder.

The Font used for the menu bar is a bold one, i shall turn it to regular, just like for the standard Windows menu (the WinLIFT menu is indeed a popup child of the main window, but not a real menu per se).

Quote
2. Loading a new model doesn't cancel former rotation and IPS display modes.
I do not like to change the user preferences that they have setup explictly from a command menu.

Quote
3. Loading a new model hides the SL panel automatically but the IPS counter stays shifted to the right.
Not by me, loading a new model doesn't hides the SL panel, for the same reason than above.
However i shall add a ZI_UpdateWindow when gP.hOverlay is visible (because of the low priority of the WM_PAINT message after the loading of a huge 3d model).

About IPS, it shows up, only when we render the model, if not, and even if enabled (as long as there is no user interaction with the model) it is not getting visible. I could change this, but for me there was no reason to display the IPS, when there is no frame refresh (idle mode).

For the other things i shall fix them, once i have found how to replicate your point 3.

Added:
I found that using Path_Combine (while in debug mode) to build the IPS string is a NoNo, i am fixing this asap  :-[

Quote
(BTW are you aware it takes 95% GPU and up to just manually rotate or drag the Onyx model across the screen?)
Doing the same i got almost half this value on my i7 computer  :-X

UPD
Quote
Yes, I guess the color picker is now redundant and so are the Front/Left/Right (light 0/1/2) menu entries and their descendants including the One dialog sets all option and its associated macros.
I just checked with a new version with all the related code removed, and the saving is 10 Kb.

Now IPS works for all cases  ;)
However when it is turned On, the GPU percentage is just the same than in rotation mode, for the purpose of displaying an accurate value, switching back to the Off mode returns to the idle mode of CPU %0 and GPU %0.

New patch from 2018-02-04 at 21:49 is attached to this post with my latest changes, and the code used by the color picker and extra menu entries and the matching macro desactivated.
Make sure to make a backup first before applying this patch

...
« Last Edit: February 04, 2018, 09:46:05 pm by Patrice Terrier »
Patrice
(Always working with the latest Windows version available...)

Michael Lobko-Lobanovsky

  • Administrator
  • *****
  • Posts: 1481
Re: Custom Lighting Control
« Reply #11 on: February 05, 2018, 01:36:55 am »
Done, thanks!

Quote
i just disabled the antialias

Got it.

Quote
I do not like to change the user preferences

Whatever. I can live with it.

Quote
However i shall add a ZI_UpdateWindow when gP.hOverlay is visible (because of the low priority of the WM_PAINT message after the loading of a huge 3d model).

Can't make any assumptions in this regard -- too low on GDImage data. I see two possible causes:

1. Differences in DWM behavior between Win 10 (yours) and Win 7 (mine, MS official extended support till at least 2020 A.D.)
2. nVidia driver glitch (I'm on a multi-monitor setup; are you?)

The lighting panel still tends to disappear on ObjReader state change but always reappears when a menu pops up or drops down, e.g. to take a screenshot, and then disappears again thereafter. See the attached successive screenies: before Onyx load, after Onyx load, Onyx full screen.

Quote
Doing the same i got almost half this value on my i7 computer  :-X

Full screen, close-up of Onyx filling almost all of your visible space? How were you able to see your GPU load measurements? My GPU load graph runs on a separate monitor.

Quote
all the related code removed, and the saving is 10 Kb

No wonder; we've been using inline macros massively rather than function calls, after all. Generally, this light control patch seems to be working, and the unused macro code may be safely deleted IMHO.
« Last Edit: February 05, 2018, 02:08:38 am by Michael Lobko-Lobanovsky »
Mike
(3.6GHz Intel Core i5 Quad w/ 16GB RAM, nVidia GTX 1060Ti w/ 6GB VRAM, Windows 7 Ultimate Sp1)

Patrice Terrier

  • Administrator
  • *****
  • Posts: 1983
    • zapsolution
Re: Custom Lighting Control
« Reply #12 on: February 05, 2018, 09:58:29 am »
Mike

First thing we were not testing the same...

I didn't make the benchmark in full sreen mode because i was aware that it would take much more CPU/GPU %, all my test were done with the window using the default startup size.
I also have a multiple display, thuis i shall make some test like you for better comparison.

Second, since Seven, many things have changed into DWM especially the z-order, because now the WS_EX_LAYERED style may also be used with child controls (before that worked only with popup).
Also into the CreateOverlay function, try to change the parent of the overlay, aka: gP.hGL rather than ghMain, also try to use the WS_EX_TOOLWINDOW to see if it makes any difference by you (i can't test this myself because all my computers are running W10).
Also displaying a popupmenu change the z-order, we must probably use setwindowpos to solve this problem as long as gP.hOverlay is visible.

Third, i didn't thought that the overlay could be used in full screen mode, thus i failed to check this, moreover in this mode gP.hMain becomes TOPMOST, thus hidding the SL overlay. I shall see what to do there.

Added
About the percentage of resources used on my computer, while in full screen mode, see the attached photography of my dual display, and the values shown on the task manager: CPU 12.3%, GPU 49.1%

For the overlay i took the decision to hidde it, while in full screen mode, just like for all the other child controls, it is being restored once back in windowed mode.

...


« Last Edit: February 05, 2018, 02:55:43 pm by Patrice Terrier »
Patrice
(Always working with the latest Windows version available...)

Michael Lobko-Lobanovsky

  • Administrator
  • *****
  • Posts: 1481
Re: Custom Lighting Control
« Reply #13 on: February 05, 2018, 03:58:54 pm »
Quote
... see the attached photography of my dual display ...

Thank you Patrice! Figures acknowledged.

Quote
For the overlay i took the decision to hidde it ...

This is downright surrender that I do not accept!

WS_EX_TOOLWINDOW helped to kill the bug in all modes when the IPS display is off, as well as in all modes when it is on except in full screen. In other words, the panel is now always seen except when IPS is switched on in full screen and the panel hides itself behind the render window. As soon as IPS gets switched off, the full-screen panel reappears again.

Can you tell me if you are protecting your GDImageClassName against brute-force subclassing?  No, you aren't.
« Last Edit: February 05, 2018, 04:13:38 pm by Michael Lobko-Lobanovsky »
Mike
(3.6GHz Intel Core i5 Quad w/ 16GB RAM, nVidia GTX 1060Ti w/ 6GB VRAM, Windows 7 Ultimate Sp1)

Patrice Terrier

  • Administrator
  • *****
  • Posts: 1983
    • zapsolution
Re: Custom Lighting Control
« Reply #14 on: February 05, 2018, 07:59:23 pm »
Please send me the CreateOverlay code that is working by you on Seven.
I think that we will have to check the OS to let it works on both W10 and Seven ... >:(
Patrice
(Always working with the latest Windows version available...)