T h e C u b eCe projet écrit à l'origine en WD12 avec GDImage 5.07,
montre comment réaliser un contrôle de type "champ cube" avec GDImage 7.00 en mode 64-bit.
This project originally written in WD12 with GDImage 5.07,
shows how to perform a "cube field" control with GDImage 7.00 in 64-bit mode.Caractéristiques principales :Main Features:1 - Contrairement au champ Cube de décor WinDev, nul besoin d'installer le framework DotNET (donc, pas d'attente lors du lancement initial).
1 - Unlike the WinDev decor Cube control, no need to install the DotNET framework (therefore, no waiting during the initial launch).2 - Vous pouvez interagir avec le cube et ses clones.
2 - You can interact with the cube and its clones.3 - Chaque face du cube peut afficher une image différente.
3 - Each face of the cube can display a different image.4 - En cliquant sur une face du cube principal (le plus gros) vous pouvez changer l'image de fond.
4 - By clicking on a face of the main cube (the largest) you can change the background image.5 - Vous pouvez déplacer le cube à n'importe quel endroit dans le champ GDImage (avec la souris ou le clavier).
5 - You can move the cube to any location in the GDImage control (with the mouse or the keyboard).6 - La fonction "clone" (spécifique de GDImage) vous permet d'avoir plusieurs cubes animés qui fonctionnent en même temps.
6 - The "clone" function (specific to GDImage) allows you to have several animated cubes that work at the same time.7 - Le GFI GDImage (visible lorsqu'on choisit un dossier image) est compatible avec toutes les animations y compris DirectX, OpenGL, et les contrôles externes.
7 - The GFI GDImage (visible when choosing an image folder) is compatible with all animations including DirectX, OpenGL, and external controls.Parallèlement ce projet montre comment effectuer une sélection avec la souris sur un objet 3D comportant plusieurs textures.
At the same time, this project shows how to make a selection with the mouse on a 3D object with several textures.
Dans le monde de la 3D, le moyen usuel d'effectuer une sélection sur un objet en mouvement se nomme : "Picking".
Cependant cette technique, basée sur l'éloignement des différents objets par rapport à la caméra, ne permet pas de connaître avec certitude l'endroit précis correspondant aux coordonnées de la souris.
In the world of 3D, the usual way to make a selection on a moving object is called: "Picking".
However, this technique, based on the distance of the various objects from the camera, does not make it possible to know with certainty the precise location corresponding to the coordinates of the mouse.J'ai donc été obligé d'utiliser une autre méthode appelée "color detection".
Avec cette méthode, lorsqu'on est en mode "HitDetection", on utilise une couleur unique sur chaque face du cube au lieu d'y "mapper" les textures.
Ensuite, il suffit de tester la couleur du point survolé par la souris, pour connaître la face correspondante.
So I was forced to use another method called "color detection".
With this method, when we are in "HitDetection" mode, we use a unique color on each face of the cube instead of "mapping" the textures to it.
Then, it suffices to test the color of the point hovered over by the mouse, to know the corresponding face.L'affectation des couleurs est effectuée dans la procédure "DrawCube" :
The colors are assigned in the "DrawCube" procedure:PROCEDURE DrawCube(LOCAL nHitDetection is int)
IF nHitDetection THEN glColor4ub(0,0,1,255)
GL_DrawCubeFrontFace(gaMt[1].Texture)
IF nHitDetection THEN glColor4ub(0,0,2,255)
GL_DrawCubeBackFace(gaMt[2].Texture)
IF nHitDetection THEN glColor4ub(0,0,3,255)
GL_DrawCubeTopFace(gaMt[3].Texture)
IF nHitDetection THEN glColor4ub(0,0,4,255)
GL_DrawCubeBottomFace(gaMt[4].Texture)
IF nHitDetection THEN glColor4ub(0,0,5,255)
GL_DrawCubeRightFace(gaMt[5].Texture)
IF nHitDetection THEN glColor4ub(0,0,6,255)
GL_DrawCubeLeftFace(gaMt[6].Texture)La détection proprement dite "HitDetection" est effectuée dans la procédure "RenderAnimation" :
The actual "HitDetection" detection is performed in the "RenderAnimation" procedure: IF gP.nHitDetection THEN
x, y is int
nID is 1byte int
ZD_GetObjectXY(IDS_3DOBJECT, x, y)
mX is int = gP.nMouseX - x
mY is int = gP.nMouseY - y
zSplitColorARGB(GetPixel(GLmemDC(), mX, mY), 0, nID, 0, 0)
IF nID < ArrayInfo(gaMt, tiDimension) + 1 THEN
MonBufferAnsi is a Buffer on 520
Transfer(&MonBufferAnsi, &gaMt[nID].FullName, 520)
gP.sUseBackground = UnicodeToAnsi(MonBufferAnsi)//gaMt[nID].FullName)
GDImageUpdateBackground()
// What is the next ListBox texture to use?
nItem is int = ListSelect(BackgroundList)
IF nItem < ListCount(BackgroundList) THEN nItem++ ELSE nItem = 1
ListSelectPlus(BackgroundList, nItem)
// Update the selected texture
swFullName is string UNICODE = AnsiToUnicode(BackgroundList[nItem])
Transfer(&gaMt[nID].FullName, &swFullName, 520)
ZI_UpdateNamedGLTextureFromFileEx(BackgroundList[nItem], gaMt[nID].ID, gaMt[nID].Square)
END
gP.nHitDetection = 0
ELSE
// Paint the resulting bitmap to our window
ZD_ReplaceObjectBitmap(ZI_CreateBitmapFromImage(zBitmapToImage( GLmemDC() )), IDS_3DOBJECT, True)
END
Capture d'écran :
Screenshot: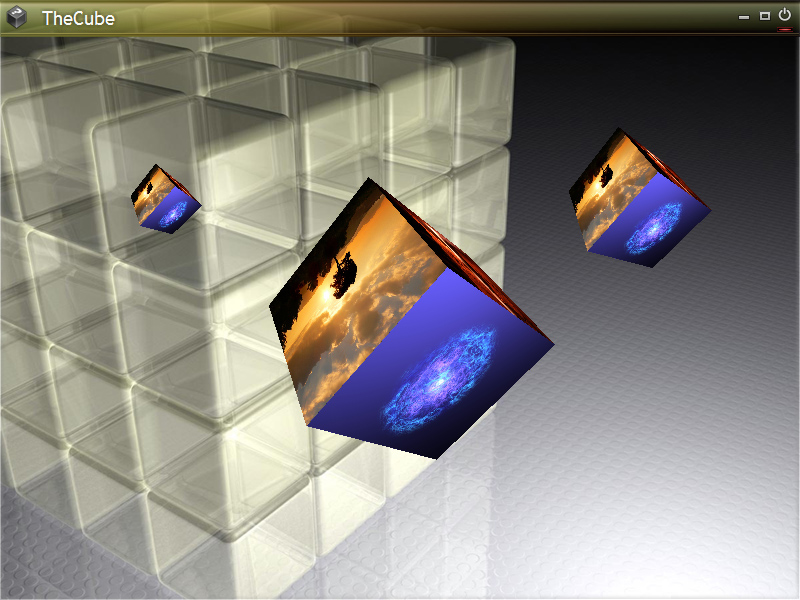 Comment utiliser "TheCube"
 :
How to use "TheCube":1 - Effectuer un simple ou double clic, avec le bouton gauche de la souris, sur l'une des faces du cube (le plus gros). L'image sélectionnée est utilisée comme nouveau fond de la fenêtre, tandis qu'une nouvelle image est affichée sur la face correspondante du cube.
1 - Perform a single or double click, with the left mouse button, on one of the faces of the cube (the largest). The selected image is used as the new window background, while a new image is displayed on the corresponding face of the cube.2 - Vous pouvez utiliser la souris (bouton gauche) ou le clavier pour déplacer le cube à un nouvel emplacement.
2 - You can use the mouse (left button) or the keyboard to move the cube to a new location.3 - Un clic avec le bouton droit de la souris permet de choisir un nouveau dossier contenant des images qui seront affichées sur les faces du cube (choisir de préférence un dossier contenant plus de 6 images).
3 - Clicking with the right mouse button allows you to choose a new folder containing images that will be displayed on the faces of the cube (preferably choose a folder containing more than 6 images).4 - Vous pouvez déplacer tous les cubes, cependant la sélection d'image ne se fera que sur le cube principal, celui qui est agrandi lors du démarrage initial.
4 - You can move all the cubes, however the image selection will only be done on the main cube, the one that is enlarged during the initial start-up.
Note :En raison de l'utilisation des fonctions 3D de GDImage, vous devez utiliser une carte graphique qui supporte les spécification OpenGL 2.00+.
Due to the use of the 3D functions of GDImage, you must use a graphics card that supports the OpenGL 2.00+ specification.Lien vers le Site de dépôt PCS