Fourteenth post of a series, translated from the "WinDev and PowerBASIC",
to explain the use of GDImage64 in
procedural* programming mode with Visual Studio 2022.
About Tutor_14It is based on a real application written in 2007 for a french administration (Prefecture du Vaucluse).
It uses markers to spot a specific location on a map or a plan.
It is able to manage several distinct projects, each one using a main background image, that is the surface used to display the markers and the annotations, the coordinates and properties of the objects are saved inside the application's "Map" subfolder. The file name used to save a project, is build on the name of the background image, followed with the extension ".gns".
Zoom ControlThe
ZI_SetProperty(gP.hCtrl, ZI_ZoomWindow, TRUE); enabled it.
It means that everything put inside of the graphic control could be resized on the fly.
Vertical selectorThis is the same concept as the vertical sprite selector used in
Tutor_13, except that this one is a tool window that can be moved around by dragging its caption.
Drag & dropUses the
CreateDropImage procedure to create a WS_EX_LAYERED window to drag the selected sprite to its destination.
RTF help filePlease
make sure to read the provided
HELP_us.rtf by cliking the user icon shown aside the close button (bottom right side).
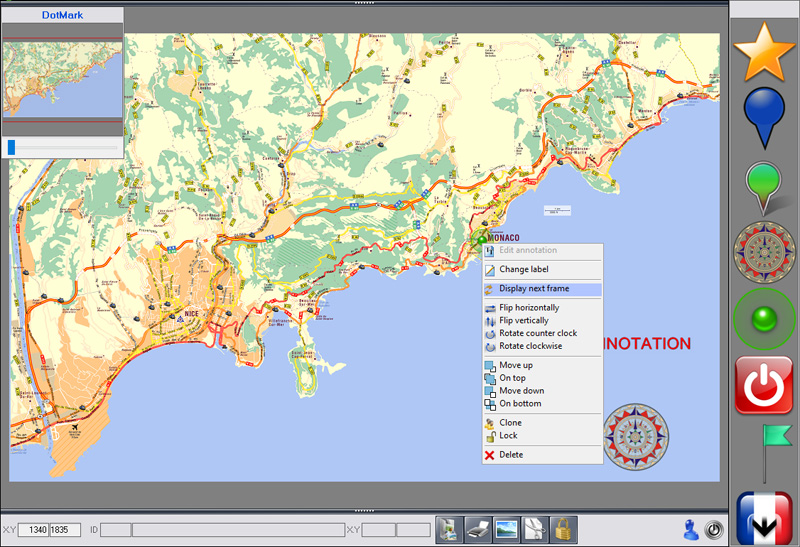
User interface1. Contact sheet:Located above the main working area, it allows the selection of a specific project.
The active project is shown in opaque mode, while the others are using half transparency.
2. Working area:
Located below the contact sheet and above the command pannel, it takes most of the main window area. The aspect of the working area relies on the zooming factor being used, and the view port section can be adjusted with the scrollbars. It is also possible to scroll the image using the left mouse button to drag directly the background.
3. Markers:They are shown inside of the floating tool window located on the right side of the working area.
To add new markers on the working area, just use drag and drop from this window.
4. Command pannel:It is at the bottom of the main window, under the working area. It is used to display the mouse coordinates and all the command buttons, as well as the "Close" button (on the right side). You can use the command panel, as you would do for a standard window caption, to move the whole window to another location (using drag and drop).
5. Moving and zooming:This small floating toold window is located on the top left corner, it is used to display a thumbnail of the whole background image, altogether with a rectangular shape, using a red perimeter to delimit the part of the image currently shown in the working area. The size of the rectangle, is based on the current zoom level, that could be adjusted from the horizontal slider below the thumbnail. You can drag the inside of the rectangle, to adjust the viewport, just like what you would do with the scrollbars aside the working area.
GDImage 7.15Is an experimental version converted to VS2022, and designed specifically to run all the Tutor applications.

*
procedural programming mode, is based on direct use of the FLAT API (Windows SDK) that is the core meat of the OS.